Friday, September 7, 2012

Christmas Wassil


2 quarts apple cider
1 46-oz. can pineapple juice
1/4 cup lemon juice
1 teaspoon allspice
15-20 cloves, stuck into an orange or apple
3-5 cinnamon sticks
Combine all ingredients in a large pot or crockpot on high heat. Bring to a boil, then reduce heat to low and simmer for 2 hours.
*You’ll notice all kinds of stuff floating around in my picture – I added some Williams Sonoma mulling spices that I had on hand; it’s not needed, though.


Halloween Popcorn


2 bags microwave popcorn, popped
1 bag candy corn
1 16-ounce package white chocolate bark*
Halloween sprinkles
wax paper
Place the popped popcorn and candy corn in a very large bowl (you need plenty of room to stir the popcorn). Melt the white chocolate bark in the microwave in 30 second increments, stirring after each time, until melted. Drizzle over the popcorn and candy corn and stir to coat each piece of popcorn. Pour the mixture over wax paper and spread into an even layer. Sprinkle with Halloween sprinkles and allow to cool for at least 15-30 minutes. Break into pieces. Serves 6-8.


Thursday, September 6, 2012

How To Have A Lovely Day


This Says It All


Frozen Reeses' Peanut Butter Pie


Ingredients

1(8 oz) Package fat-free cream cheese
1/2 cupCreamy OR crunchy peanut butter 1
1/2 cupBaking stevia OR 1 cup sweetener of choice that measures like sugar 2
1/4 cupskim milk (or milk of choice)
1(8oz) Container Light Cool Whip
1Pre-made Oreo pie crust OR reduced fat graham cracker pie crust
3 tbsLight Hershey’s Syrup
OptionalToppings: Reese’s Ice Cream toppers (a few Tbs), Reese’s miniature candies (a few crushed up), crushed peanuts, 100 calorie Nutter Butter cookies (crushed up), Reddi Whip
1 You may replace the peanut butter with 1/2 cup peanut flour mixed with 1/4 cup skim milk (or milk of choice), which will shave 560 calories off this recipe! The only downfall is you have to buy it online. Peanut flour is basically a de-fatted version of peanut butter and is in powder form, so once you add water, it is just like peanut butter! I use it in my protein shakes, desserts, etc. and I think it is worth purchasing.
2 I used NuNaturals More Fiber Stevia Baking Blend. If using packets of stevia, I recommend using about 8-12, or adjust according to taste.


Nutrition Breakdown

10Slices
189Calories Per Slice (or 133 Calories Per Slice with Peanut Flour)
5WWP+*
*Weight Watchers Points per serving


How To Make A Bucket Of Snowballs


How to make a bucket of snowballs with Styrofoam balls and quilt batting. 
Materials:
     

  • Styrofoam balls
  • Quilt or Craft Batting
  • Colorfill "Diamond Vase Filler
  • Tacky Glue  
    Directions:
                
    • Cut a circle from the batting large enough to wrap around your Styrofoam ball.
    • Brush a generous amount of tacky glue on the Styrofoam ball
    • Wrap the batting around the ball, trimming off any excess. Don't worry about making the batting perfectly smooth, as the imperfections will make your snowballs look more realistic.
    • Allow to dry thoroughly.
    • Pour Colorfill "Diamond" into a shallow bowl
    • Brush generous amount of glue on the top of the batting.
    • Dip the ball into the pellets and press to adhere them.
    • Repeat until the entire ball is covered with pellets. Allow to dry overnight.

Weight Loss Boost..Get Ready For The Holidays

To boost weight loss - 2L water, 1 medium cucumber, 1 lemon, 10-12 mint leaves. steep overnight in fridge and drink every day. Also great for general detox--including clear skin!


No Bake Energy Bites...These Are The Greatest


Ingredients:
  • 1 cup (dry) oatmeal (I used old-fashioned oats)
  • 2/3 cup toasted coconut flakes
  • 1/2 cup peanut butter
  • 1/2 cup ground flaxseed or wheat germ
  • 1/2 cup chocolate chips (optional)
  • 1/3 cup honey
  • 1 tsp. vanilla
Method:
Stir all ingredients together in a medium bowl until thoroughly mixed.  Let chill in the refrigerator for half an hour.  Once chilled, roll into balls of whatever size you would like.  (Mine were about 1″ in diameter.)  Store in an airtight container and keep refrigerated for up to 1 week.
Makes about 20-25 balls.
Ali’s Tip:
Substitution ideas can abound for just about any of these ingredients!  Feel free to substitute in your favorite nut butter (almond butter, sunflower seed butter, etc.) for the peanut butter.  And you could also add in some wheat germ in place of some or all of the flaxseed.  I would caution, though, against substituting agave nectar for the honey, as the honey’s thickness helps hold things together.
Some other fun substitutions for the chocolate chips (or an addition to them) could include:
  • chopped dried fruit (apricots, dates, raisins, etc.)
  • dried berries (cranberries, cherries, etc.)
  • chopped almonds, pecans, walnuts, or sunflower seeds
  • other chips (butterscotch, dark chocolate, milk chocolate, white chocolate, M&Ms, etc.)
  • other grains (different kinds of oatmeal, rice cereal, etc.)
Update: Many of you have asked about substitutions for other ingredients.  The joy of these bites being “no bakes” is that this recipe is super flexible.  If you end up needing to omit one of the dry ingredients (such as coconut or flax), just add in some extra of whatever other dry ingredient is remaining (for example, the oats).  If you feel like your energy bites are too dry, add in extra honey or peanut butter.  It’s also not required that you refrigerate these, but I find it helps them stick together much better.  And for some reason, I love things like this a little bit chilled.  Enjoy!!


Healthy Greens...A Must For Your Kitchen


4-Ingredient Banana Chocolate Chip Bread


What You'll Need:
Yellow Cake Mix
2 Eggs
3-4 Overripe Bananas
1/2-1 cup chocolate chips, nuts, etc.

Smash bananas in a large bowl (I just mixed them in my KitchenAid), then add remaining ingredients and mix well. Batter will fill 2 small loaf pans (GREAT for gifts!!) or one large loaf pan. Make sure to spray pans well with nonstick cooking spray and a little bit of flour.

Bake at 350° for 35-40 minutes (bake longer if using larger loaf pan)

Tip: Freeze overripe bananas until you have enough to make a loaf of this banana bread!
I put them in a Ziploc bag - peel and all - and thaw when you're ready to use! They stay good for up to 3 months.

Homemade Carpet Fresh

Homemade carpet powder to the rescue!!  It's cheap & it has not met an odor that it doesn't take care of.  

All you need is baking soda & orange essential oil.  You can use other essential oils if you like, but I like the orange. You can buy any room scent oil at Wal-Mart.

It is also nice to have an empty Parmesan cheese container, or some other shaker.


Mix the baking soda & several drops of the orange essential oil together in a bowl using a whisk.  Then, spoon the mixture into your shaker.  

Sprinkle onto your carpets - let it sit for about 15 minutes, then vacuum up.  

Simple, thrifty, & works like a charm.


100 Uses of the Magic Erasers


What Mr. Clean Magic Erasers Can Do:

  • remove dried paint from door hinges
  • remove tarnish from silver
  • remove mold & mildew from anything plastic
  • clean & polish gold jewelry
  • remove soap scum in the tub and shower
  • remove marks on walls
  • clean splatters inside the microwave
  • remove marks on vinyl siding
  • clean mirrors in the bathroom (keeps shower mirrors from fogging)
  • remove adhesive residue after removing stickers
  • remove waterline mark around the pool
  • remove hair dye from countertops & floors
  • clean light-colored suede
  • remove black scuff marks from baseboards (where the vacuum cleaner hits)
  • clean the outdoor side of window sills stained from leaves, dust and dirt
  • clean plastic coolers inside and out (…even dirty grimey ones used by men with greasy hands!)
  • remove rust spots & stains on countertop
  • remove cooked-on stains in pots and pans
  • remove soot off the walls near the fireplace
  • clean within the grooves of lawn ornaments
  • clean sticky/dusty range hood over the stove
  • remove nail polish spills or stains
  • clean airbake cookie sheets & bakeware (the kind with all those tiny grooves)
  • clean oven shelves & the grates on the grill
  • remove wet nose marks from pets on the windows (even car windows)
  • remove toothpaste splashes from bathroom mirrors
  • remove melted plastic on the side of the toaster oven
  • remove grimey green algae from cement (bird baths, steps, ponds, etc)
  • clean stained elbows from dirty work
  • remove green mildew from siding and gutters
  • remove paint spills & oversprays
  • remove toilet bowl rings (just cut a piece off & let it set in your toilet overnight)
  • remove built-up algae, water deposits, etc from ceramic flower pots
  • clean dish drainers that are gunked with lime and build-up
  • remove bird poop from concrete bird bath
  • remove coffee & tea stains that remain inside a mug, caraffe, thermos even after washing
  • clean the plastic agitator inside your washing machine
  • clean window screens (even when they are still in the window)
  • remove built-up baked on grease inside the deep fryer
  • clean inside the crock pot
  • remove melted plastic on a glass top stove
  • clean swimming pool steps
  • remove baked on brown spots on cookware
  • clean antiques & collectibles
  • polish collectible coins (UPDATE: coin experts recommend that you do NOT clean coins.)
  • clean & shine things up before you sell them in a yard sale
  • clean boat & outdoor furniture upholstery
  • clean vinyl striping on motorhomes, vans, boats
  • clean car tires, including white walls
  • clean pebbled surfaces like the outside of plastic coolers
  • remove pet & child vomit from carpet or clothing
  • remove scuff marks on motorcycle & ATV helmets
  • remove grass stains from shoes after mowing the lawn
  • remove scuff marks from hangers/shoes in the walk-in closet
  • clean oven door
  • remove pollen from patio furniture, cars, etc.
  • remove soap scum and gunk from around the bathroom faucets
  • remove hairspray build-up on countertops and vanities
  • remove soap scum inside porcelain & utility sinks
  • clean stained caulking along the kitchen sink & countertop
  • clean your bicycle, even the tires & rims
  • clean tile & grout
  • remove mildew from tents, vinyl canopies, awnings, fiberglass items
  • remove paint overspray that has dried
  • remove shoe marks from the kickplate of house doors & car doors
  • clean inside your car (along the handles, window ledge, arm rests, dashboard)
  • remove scuff marks and dirt from linoleum floors
  • remove stains on leather seats, purses, chairs, etc.
  • remove food stains inside plastic food containers
  • remove brake dust from tire rims
  • remove dirt and grime on a vinyl convertible top
  • remove nail polish from walls, carpets, wooden objects, plastic
  • remove soil or scuff marks from ceramic tile flooring
  • clean non-skid surfaces with tiny grooves (bathtub floors, refrigerator handles, pool steps, cooler lids)
  • clean & shine bathroom faucets & fixtures
  • remove magic marker, permanent marker, and ballpoint ink from virtually any surface
  • clean doll faces
  • clean textured handles on major appliances (dishwasher, refrigerator, stove)
  • remove fingerprints and dirt on light-colored kitchen cupboards
  • clean inside of the refrigerator
  • remove crayon marks from walls
  • remove dirt from plastic trash cans
  • remove dark paint on light-colored carpet
  • clean soap scum and oils from hot tub
  • clean a car’s vinyl interior (gets into the tiny crinkles in the vinyl armrest, etc.)
  • clean white porch railings, columns & pillars
  • remove bugs from car windshield, grille, and bumper
  • remove paint scratches on your car from minor fender benders
  • remove rust and corrosion that’s built-up on the outside of pipes (kitchen/bathroom)
  • clean & shine hubcaps
  • remove built-up grime on the car steering wheel
  • remove finger prints & build-up on the keyboard and mouse
  • remove oxidized paint from an old car
  • remove built-up gunk from vinyl seats
  • remove tar from your car’s paint
  • remove set-in stains inside glass and plastic pitchers
  • remove scuff marks from the back of car seats (from kids’ shoes)
  • clean kids’ plastic toys
  • remove dirt and grime from athletic shoes and shoes with leather uppers
  • remove stains on the underside of the toilet seat
  • remove fingerprint & handprints from light-colored doors & walls
  • remove scuff marks from your patio furniture

How To Get The Most Out Of Magic Erasers

The only downside to these eraser blocks is that they don’t last long. But that’s a testament to their cleaning power — their tiny pores get filled with all the gunk that’s hiding in small spaces.
To get more life out of your Magic Erasers, try this:
Mr Clean Magic Erasers -- cut in fourths -- two clean ones and two used ones.1. Cut each Magic Eraser into 4 equal-sized pieces (across the shortest width of the eraser, rather than lengthwise). This way, you get 4 times the amount of cleaning out of one Eraser!
2. Lightly mist it with water (by misting or using the kitchen sink sprayer), rather than saturating it with water — which causes it to shrivel up more.
3. Scrub lightly with the Magic Eraser, then wipe the area with a wet towel to prevent smearing the dirt/grime and remove any residue.
4. When it starts to get yucky (after cleaning a few different items), simply spray rinse it again to revive it a bit. Then squeeze the excess water out, and continue using it until it starts to shred.

Canning Potatoes...I'm Glad You Asked...


Someone asked me recently when I said I was canning potatoes... "Why? Why would you want to can potatoes, they're so readily available, inexpensive, and they keep a good long while?"

Well, I'm glad you asked!

Here's what I did...

The hardest part of canning potatoes is cleaning them (my plan was to can them with the skins on)... I don't know what the dirt is like in your neck of the woods, but in my garden there's mostly beautiful red clay... that stays moist even on the driest day... and clings to potatoes...

I started out by sorting out the ones I wanted to keep for eating on... the blemish free, good-sized ones to store in a basket in my kitchen...

I dumped the taters into the sink and scrubbed them with a brush... then rinsed them... filling the sink several times and rinsing and rinsing yet again... until I had scrubbed them clean.


Once they were all scrubbed and clean, I began preparing them... I trimmed all the bad spots, rotten spots, and cut spots off... I cut them in large dices (maybe an inch to 1-1/2 inches?)... depending on the size of the potato... the tiny ones were left whole or cut in half. I cut them into a pot filled with cool water so they wouldn't turn brown. After I got a pot full, I drained the water out and gave them another little rinse and refilled the pot with clean water.


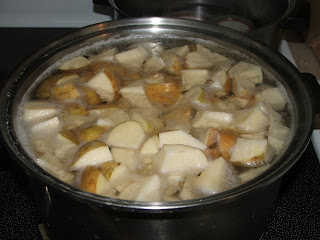
I brought them to a boil over medium high heat... and boiled them gently for about 5-10 minutes... heated through but not soft.


I then drained them and discarded the cooking liquid.

I packed the hot potatoes into hot quart jars...


...then ladled fresh boiling water to cover the potatoes, leaving a half inch headspace.


I added salt to my potatoes (this step is optional)... 1 teaspoon canning salt per quart jar.


I wiped the jar rims with a damp cloth...


I tightened the hot lids on to fingertip tightness.


Then processed them in my pressure canner at 10 pounds of pressure for 40 minutes (pints would be 35 minutes)

After processing, I removed the jars from the canner using my jar lifter.


...and set them on a folded towel on the counter to cool... and to listen for the PING! of each successfully sealed jar... Music to my ears!!!!!

A grand total of 26 quarts of delicious potatoes!

Mini Raspberry Swirl Cheesecakes


DIRECTIONS